Wednesday, December 3, 2008

Midztoyz year end sale!

For those of you living in Indonesia (sorry to all my International readers) and wanted to try out the material that I use to make figures, now is your chance!!!

I'm having a clearance sale for MpoxZ epoxy putty and MwaxZ modeling waxes. You can get 300 g of either one of the products for just Rp.50000!!! (exclude shipping & handling)

Hurry this promotion is valid while supplies lasts. Go on to Midztoyz@Multiply to get the complete info!

also...
Check back in a couple of days to see the girls (and Toph) in-action (wink wink nudge nudge)

Cheers!

Saturday, November 22, 2008

The Fire Nation Girls Action figure project!!

What happened to the Ty Lee figure? Well, she just got some company.
This update is all about the head sculpts. I've sculpted all the head for the girls and then some. They will all be using the same base body though. There will be modification for the individual girls you can be sure of that. As usual more pictures after the jump!

ty lee and the fire nation girls action figure project


As promised here are more pictures. Enjoy!


The base body.


What is (the head sculpt of) Wang Fire doing there?


Sorry I didn't take a picture with the Mai head (still need some work). Hmmm... should I make a special "The beach" version of the girls... I wonder..

Check back soon.
Oh and Colorwheelz, sorry I haven't the time to take a picture of the bucket. Next time, for sure!


, , , ,

Friday, November 21, 2008

Ty Lee Action Figure project WIP 01

Yup you read it right!

As you all might know, I'm working on a Toph action figure. That project is currently on hold, until I can find some solution for her articulation. In the mean time, as I promised (many many moons ago), here is the first couple of progress pics on Ty lee.
She's one of the 3 Fire Nation Girls that I'll be making. Eat that Mattel!


More pictures inside!


This figure is about 5.5" and is sculpted in my homemade modeling wax. I've finally got a firm wax that I can do rapid prototyping on. YEY!
If you look closely you might notice that I adapted elbow joints from Revoltech Revy. I'll be making ball joints for the shoulder and hip. Still don't know about the legs though.

You might also recognize the changeable breast piece like the ones found on Konami's Busou Shinki MMS figures. This is because the body will be a base body where the Fire nation girls will all be made. So I only need to make new head sculpt and adjust their measurments accordingly... (or not... hehehehe)

Check back soon for more progress and the new head sculpts for Mai and Azula.
Until then!

Ty lee action figure project wax WIP 00

Ty lee action figure project wax WIP 01

Ty lee action figure project wax WIP 02


Tuesday, November 18, 2008

Midz's workroom...

This blog needs more frequent updates, and you all know it. But there is so much from sculpting and figures (that I can share at the moment) to keep this blog interesting. So I'm going to start posting my ramblings... yes, I know you're thinking, "This is not why I came here for! Gimme TOPH dang-it!!!". I feel you... I feel every virtual punch, kick, and atomic wedgie you throw at me, but bear with me... more after the jump. There'll be picture!


Above is a (poor) panoramic picture my workroom. The editing is crude, I know.
As you can see my workroom is also my sleeping quarters. For the sake of having a larger space I opted to remove the bed in exchange for a futon, a pillow and my bolsty. But this is still not enough. I have stuff everywhere (I know where everything are by the way... well, almost) and loads of sculpts, reference material and toys strewn all over the place. I think I need to refurnish my room.

There are online stores that sale furnishing stuff. WikiShop for example, Amazon.com is another good place to start. I don't have access to both of them where I live though, which is a bummer. But that doesn't stop me to at least see the choices that can inspires me to make something, even though it'll cost more than just buying something in the end.

The first thing I need is more space and that means SHELVINGS!!! You guys living in the states got it made. You can get great looking shelving as low as $15!! It cost more than triple that where I live. If not more. And the current exchange rate isn't helping. For comparison, you see those cheap looking (because it is!) plastic shelving on my desk? that's about $4 for a 3 tier shelving. Sad isn't it. Compare that with the shelving found here (input the maximum price of $30). Those shelving look sturdy and I don't mind paying $20+ for some good racks (no pun intended).
The closest thing I come across as good shelving is at my local Ace Hardware furnishing section. Mind you, here in Jakarta, Ace Hardware is notoriously known for having the highest prices for home/garden/furnishing and tools too. How does a 3-5x markup makes you feel? ... Yeah, I thought so too.

After looking around. I think I'll opted to make a shelf from those perforated L bracket thingy like the one shown here. It'll cost more money (hope not) and time in my part (there will be much bolting and screwing around this weekend), since I probably will be making them myself. But that's just the way I like it. Yeah... that's how I roll.

Thanks for reading thus far.
Stay tuned for the next update. It'll be a teaser for the new sculpts I was talking about in an earlier post :)


Saturday, November 15, 2008

OMG ANOTHER UPDATE!

Hiya folks,

Sorry for neglecting this blog for quite a while.
Just a quick update from me. I've reserved a table at the annual Tomoci Fair which will be held on the 28th - 30th of November at the TransTV building, Jakarta. I'll be posting teaser pics of the NEW sculpts that will be shown there. Some of them are already kit-bound.

So if you happen to be have time, do drop by for a visit
See you there!!


Wednesday, October 1, 2008

Happy Eid ul-Fitr to my Moslems Friends!


Happy Eid ul-Fitr 1429 H my Friends!


من العائدين والفائزين المقبولين


The day to Forgive and be Forgiven

Forgive me for not updating this blog as often as I should ;)

Stay healthy everyone, more awesome news coming soon!

Sunday, September 28, 2008

Pandevi 5aga figurine project: Bima WIP02

I've completed sculpting Bima for my Pandevi 5aga line.
I only need to sand her down and spray a coat of primer before painting her up.

I've learned much from sculpting at such a small scale. Mostly patience and a LOT of delicate needle work. All in all I'm happy with the result. Even if I think that I could do better, it's best to just finish it up and work on another piece (Arjuna). I'll update on the painting process as I go along.


More pictures after the jump!


I don't have my light tent set up so sorry for the crappy pictures. I'll retake them in the future.


Bima 3 inch figurine sculpted in MpoxZ epoxy putty 1/5 Bima 3 inch figurine sculpted in MpoxZ epoxy putty 2/5 Bima 3 inch figurine sculpted in MpoxZ epoxy putty 3/5 Bima 3 inch figurine sculpted in MpoxZ epoxy putty 4/5 Bima 3 Inch figurine sculpted in MpoxZ epoxy putty 5/5

On another note:
Sorry for the delay of the Arjuna follow-along article. Just stay with me on this. I'll get it done soon.

Happy sculpting everyone!

Friday, September 26, 2008

Small announcement and more sculpting video!

The Arjuna Follow-along will be up later tonight. Sorry for the delay.

***Update*** It seems the follow through will have to wait until tomorrow. I need to take more pictures and write more stuff. Sorry for the inconvenience.

In the meantime, more sculpting video from YouTube!!

First up it's Philippe Faraut. He's a great sculptor. I really dig his style and approach in making portraits. Still need to find his book though. Be sure to check his channel and site out.


Speaking of approach. Here's one for a full figure sculpt. No armature needed. I've personally tried this and it's pretty awesome when using wax. You do need to have a firm grasp of anatomy and proportion though.


And the last one for today is about wood carving. What that got to do with making a figure? you asked. Well, for those of you who use poly putty as a medium, you know you need to carve. This is a great demo to show how the process is done. Meke sure you check his series on woodcarving 101. It's great stuff.


Happy sculpting everyone!

Wednesday, September 24, 2008

Random sculpting: Amber from shortpacked

Here's Amber from David Willis' web comic Shortpacked.

It's sorta like a sketch, do it fast, do it accurate, and capture the likeness. Haven't decide will I going to finished it or not. She's about 5" tall and was done using my new Soft MwaxZ formula. It's true what Tony Cipriano said, that making a sculpture/statue from a 2d character is more difficult. I still need to practice more.


 Amber figurine or mini statue WIP done in soft modeling wax

On another note, the Arjuna "tutorial" will start on Friday, so be sure to wait for that.
Until then, happy sculpting!

Friday, September 19, 2008

Bima 3" WIP photos

Whats this?! an update and no Toph!?
Well just be patient now. It wont be long :)

This time it's a blast from the past for me. Early in this blog's life I posted about a figure of Arjuna and Bima. My own perception of the characters from the Pandawa stories. That was almost 2 years ago. Now I revisited that Idea and am gonnga try making complete figures for them.. in miniature size. Well, not your regular miniature size anyway.

So first up is Bima in all of her 3" glory. Her bio in in the works and I'll be posting it with the finished painted sculpt soon.
Here's a peek at what has been done so far

Bima 3

She's sculpted entirely out of my home made epoxy putty called MpoxZ. Cures fast and rock hard. The next character I'm going to make is Arjuna. There are a total of 5 figures in this line, and I'll be keeping you updated on each one (and Toph... and Ty lee too). So stay tuned!

Cheers everyone!

Monday, September 15, 2008

For my Indonesian readers!

I've created an Indonesian multiply page for Midztoyz!

You can access the page at http://midztoyz.multiply.com.
There will be exclusive content there, and you can even buy stuff there, like my homemade waxes and epoxy putty.

Be sure to drop by!

More sculpting videos from Youtube

Yep an update!
Sadly it's not about any of my projects. Sorry about that.

Here's a video about decanting a spray paint to use with your airbrush. A nifty trick to learn if you paint your own kits.
There are 2 parts of this Video. As usual I only post the first one, you need to go to the channel to view the other one.


Now this is video series is the shiznit! Do visit Studioworkx channel at Youtube. If you're a miniature sculptor, or interested in seeing a miniature sculptor work, then this is the place.

Here is the first part of a 15 parts series on sculpting a Frogdemon from start to finish using epoxy.


More info on my ongoing projects soon..
Happy sculpting!

Wednesday, August 20, 2008

The World Warrior -- Live Action (English subs)

I know it's not figure making related, but this is just too cool to pass up.

And yes, to those of you who were wondering if I'm still making Toph and the FN girls...Yes, yes I am. Cant promise when I can show photos but be sure I'm still doing it.

Meanwhile, enjoy this video. And watchout for Zangief :D

Tuesday, July 22, 2008

I'm still doing it!

Yep, still making Toph and the Fire nation girls. I've been busy this past month so this project hasn't got the love it needed. Here is an early snap of Fire-nation outfit Toph. I haven't the chance to snap newer photo. Sorry.


Thursday, July 10, 2008

Pool result

Hiya folks,

The result of the pool is here. I've asked you, of the three fire nation girls (Azula, Ty lee, May), which one do you want to be featured in midztoyz? By featured I mean make an action figure of, like Toph!
We have a tie for Ty Lee and May, strange I though Azula would at least get one vote.
But since I can do so much, I think I'll do them one at a time. starting with Ty Lee.
Pictures will surface soon... very soon.

Stay tune and thanks for voting, yes all 4 of you :D


Tuesday, July 8, 2008

Masaofujikawa's sculpting videos

You can never know what you'll find when you browse YouTube.
I've just these videos posted by masaofujikawa. Good stuff using paperclay, so fast too.


Face art


Face art 2 (rabbit)


Face art- Girl


face art 4(garl)

Friday, June 27, 2008

Aww crud...


She looked pissed. The update is underway.. need more time though.
Please be patient, and stay tune!

Thursday, June 19, 2008

New poll and some good news

Hi gang!

It's great to be back working again, the injuries earlier in the week sure hamper my work schedule, that and having a Wii in the living room doesn't help either.

I've added a new poll about the next figure that'll be feature in midztoyz. You can now choose which fire nation girl will be next in line. I was planning to make all three, but somehow work keeps piling up so I need to make some priorities. At the end I settle to make just one of the girls for now. Keep in mind this will also be an articulated figurine, it's hard stuff and not something that you can whip up in a flash. So start voting!

Be sure to tune in for Saturday's post. I'll post some sneak peek on Fire nation Toph and the girls then :D
Cheers everyone!

Sunday, June 15, 2008

Temporary break due to 'injuries'

Hiya folks!

Sorry for not updating as frequent as I wanted it to be. I have sprained my upper arm :(
The story behind it all revolves around me getting myself a Wii. This console is evil!
I played Wii Sport, competing against the whole family, my mom beats the crap out of me in bowling. After a good 6 hours or so, I retired. The following day, I woke up with a stiff right arm. Fortunately it's only my upper right arm. I can still do some work without much pain. Will have to stay away from the Wii a while though. It saps time like no tomorrow.

On other news, I've got a surge of hits these past few days. It seems Toph is getting noticed more :)
Thanks for the visits you guys!
Still no new worthy pictures yet, but I can tell you this. The is another Toph figure in the making, and she's wearing red.
I've also started on the Azula trio, at least in sketch form. Hoping that the set would be completed by 1st week of July to be shown at a local Toyfair.

I'll post pics on the girls soon.

Friday, June 6, 2008

MidzToyz on HoKKi


Here something you don't see everyday, I got interviewed!

The great admin of Hobi Kriya Kita has posted an interview with yours truly.
You can read more about the interview here >> Edsa: Figur di balik figurin MidzToyz. It's in bahasa Indonesia though.
There are also some great articles on craft works on the site, so do check it out!

Now you can actually see how disorganize and messy my workspace is :lol:

Wednesday, June 4, 2008

Claudio Setti - Sculptures

I only know Claudio from his Blog and from the forums. But I think we all agree that he is a great sculptor. You rock Claudio!

Here's a couple video of his working process uploaded by m0delista. Enjoy!


Toph Action Figure WIP part 5

Not much just to show the another pose from Toph.
I'll get to work on the ball joints soon.


Toph action figure wax sculpt wip 060108/><br/><br/><div align=

Monday, June 2, 2008

Toph Action Figure WIP part 4

Okay, here's some more WIP pictures.
I Cut up the leg joints. It's not your typical joint design, I 'borrowed' it from Revoltech Revy. This way you wont disturb the flow of the sculpt with ugleh ball joints. But the down side is the cut is so visible, it disturb the flow of the sculpt Rolling Eyes Go figure...

The elbow is a normal hinge joint. I'm kinda surprised my wax is strong enough to make these Very Happy
So total Points of Acticulation (POA from now) is already 11! And I'm still going to add shoulder joint, hands, and feet. Oh boy...

For the pose, it's not great. Since this is only a test fit, the joints are all loose... very loose. So posing her is a bit of a challenge, at least for now.


Toph action figure wax sculpt wip 060108/><br/><br/><div align=

Saturday, May 31, 2008

Toph Action Figure WIP part 3

Just a quick update on the current state of my Toph action figure.

Shes about 70% done in the sculpting stage. Next I need to smooth the surface, cut up the joints and make some mold.
This is going to be a looooooooong weekend.

Toph action figure wax sculpt wip 053108/><br/><br/><div align=


Zgok Custom into Airman

A great step-by-step custom video. Zgok into Airman. Pay attention in making those hand and fingers.

Friday, May 30, 2008

Toph Action Figure WIP part 2

Just a quick update on the current state of my Toph action figure.

Doing this in wax sure is a whole new learning experience. To get a smooth surface I fist rake the surface of the wax. Then using heated sanding pad, I scrub the surface smooth. For polishing, I use water and t-shirt rag, I find that using sanding pad also work beautifully (don't heat the pad this time).

In the last post I said that I don't want to so ball joints. Well, scratch that. Toph will have at least 2 ball joints on her. I'm still trying out the mechanism though. More soon!

Sunday, May 25, 2008

Toph Action Figure WIP

Just a quick update on the current state of my mystery action figure.


Toph WIP

If you watch Avatar: the last air bender, you probably know who she is. She's Toph Bei Fong, my favourite character in the avatar universe. As you can see this is still a very rough sculpt. For this figure I'm going to go simple in the articulation department. So Toph will have at least 10 articulation points. The joints are in the neck, shoulder, elbow, hand, hip, and knee. I might add more though, but I don't think I'm going to include ball joints in this figure, because I don't know how to make them :p

More to come in the coming days.


Friday, May 23, 2008

Mystery Action figure! articulated! OMG!

I should have uploaded photos on how to work with wax, at least how I work with it. But I think that a video might explain it better then words or still photos. So I'm going to postponed the wax working photos and make a video of it.

As a subject for the video, I've planned to do a mystery action figure. Articulated and made in wax. Then I'll transfer the wax sculpt to a more sturdy material for finishing and painting. For those of you who asked about doing some articulated figure, either anime or not, you'll gonna love this.

For now I leave you with this very early, and fugly, WIP shot. Try to guess the figure I'm trying to make ;) here's a hint: Rock Loli

rock loli action figure wip 01

Stay tuned, and subscribe so you don't miss out :D

Wednesday, May 21, 2008

Nendoroid Vocaloid

This is too cute to pass up.
I think I'm going to go and sculpt some nendoriod-esque character...hmmmmm

Wax figure tool works

Working with wax can be tough if you don't know how the material works.
One of them is working with heat or heated tools. I'm a beginner in doing wax, and most of the pro that I've know suggest to invest on a waxer pen. It cost a lot too, fortunately some cool guys made a DIY waxer pen using cheap soldering iron. I haven't tried that, but will if I had the time (already making plans to build a dimmer box). In the mean time, I'm doing my wax sculpt with these...


The only thing that I consider hi-tech and expensive in my arsenal is the small butane torch (it's $15). The oil lamp (filled with Alcohol) and the stove lighter can be obtain easily.

I mainly use the lamp to heat my metal tools and heat up small chucks of wax for patching. The stove lighter and the torch is used for blending the wax and make it smooth and shiny. I've taken pictures on how I use the torch to blend the wax, but it came out blurry. So I need to retake those photos again. I'll post them on Friday, so if you're interested look forward to it.

Stay tuned!

Tuesday, May 20, 2008

M.WaxZ Trial Run part 2: Sculpt test

Well, I though what better way to test a modeling/sculpting wax than to sculpt with it. So I've started to sculpt this bug babe for the clubhouse 55th sculpting jam. I'm using a modified version the S00 wax. To make the wax pliable, I use a desk lamp with a 40 watt lamp to heat it. If I see the wax becomes too liquid, I turned off the lamp and rest the wax.

Here's what's done after a couple of hours of wax 'testing'.

bug babe wax figure sculpt WIP
The armature is made from aluminum wire, a simple armature that I'm very fond of. I add small balls of wax to build up the body and define muscles. I then use a small butane torch to blend the wax balls up. At this stage I rarely use my tools, but then again your fingers are your best tools. I need to make a rake tool to further blend the wax together. From here on out I may need to use heated tools. I'll cover that in tomorrow's post.

What I find is the S00 wax is fast to cool but not very strong for small, thin pieces. It's stiff, but not strong. It's also doesn't retail heat very long. So you need to constantly warm the wax. The warm wax sticks and blends to the cold wax just fine, which is great although I probably like it to be more sticky.
The cooled wax carved and cleans well. Haven't had the time to polish this yet, but earlier experiment shows that S00 can be buffed with alcohol and even better when it's chilled.

Sculpting with modeling wax is fun! It takes some learning curves, but every mediums have one. I'll post more picture in the near future. Now I need to make a batch of hard wax to get my Toph sculpt ready.

Friday, May 16, 2008

M.WaxZ trial run

In my ongoing quest to make myself some good modeling wax, I've finally able to say that,"I think I found something!"
Inspired by Gary Overman and his wonderful waxes (visit www.willowproducts.com) I start my journey on the land of waxdom. Gary has been a great guy in giving me some pointers on mixing my own wax, so I want this chance to thank Gary for his help. Thank you Gary!

Unfortunately some material that Gary suggested isn't readily available where I lived (Indonesia), so I need to find alternatives, substitute, and experiment with various material to get something that I can call a modeling wax. My main motivation is to produce a modeling wax for local sculptors that is readily available locally, uses local ingredients (as much as I can), and is safe to play with.

After much experimenting and even more failed formulas...many I tell you! I've picked 4 formula that I'm happy with (thank God!). Do note that the color are to make it easier for me to recognize them. I'm planning to make them all light grey in color if they ever go to production. They are:

the 4 M.WaxZ flavor. Soft (white), firm (tan), hard (green), and WTF! (dark chocolate)
  • M.waxZ-D00 the hardest of all, tends to be sticky but very pliable when warm, the dark brown one.
  • M.waxZ-L00 The softest of the waxes, tend to crumble easily when cooled, the whitish one.
  • M.waxZ-S00 My current workhorse wax, firm at room temperature, but soft and pliable at body temperature, the light brown one. This is the stuff I made Nariko of, I did her hair using D00.
  • M.waxZ-K00 a harder variant of S00, take detail and carve quite well when cooled, the green one.
I've already sent samples to my testing team, and hope to get feedback from them soon. In the mean time. For those of you who are interested in these waxes, please be patient. I'll surely keep you all posted on them. In the mean time, in the next few postings we'll be exploring more about modeling wax, their properties and how to use them. I might even make a video of it in the future. How about an anime head sculpt video using wax?!?

Stay tuned!

Wednesday, May 7, 2008

Family Guy: Asian Trix Comercial

This is the video that go me in the groove to sculpting the Crazy Trix Rabbit from the last post.

Yeah, you should share...greedy kids!

Doodle Sculpt: Crazy Trix Rabbit

Did this for the Clubhouse Sculpting Jam #54. The theme is Cereal box.
I've come up with a concept for the Silly rabbit on those Trix commercials, with the slogan "Silly rabbit, Trix are for kids!". He finally snaps! Combining elements from the Batman Dark Knight's Joker and Kill bill I've sculpted this.

Now imagine he's saying,"Silly kids, why so serious? You know no Trix will make silly rabbit go CRAZY!"
He is holding a crumpled box of Trix in his right hand and yeah, that's a severed hand :)


Friday, May 2, 2008

Current figure WIP: Nariko from Heavenly Sword

Finally after a long testing and experimenting, I think I've found myself a nifty modeling wax formula. YAY!

To test drive this formula, I sculpted a figure of Nariko from Heavenly Sword for The Clubhouse 53rd Sculpting Jam. It's a slight departure from making the usual anime figure, but this was fun...so much fun!
That and mostly I'm still giddy from excitement because I've finally found a wax recipe (and ingredients) that works!! :))

I am poor at documenting my progress. So forgive me for the lack of progression steps in the photo.

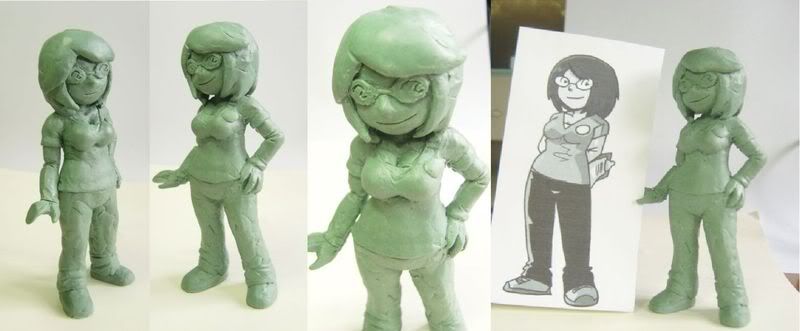
The first step I did before making the figure is to gather references. A Lot of references. You can't have enough references :D I found Creative Uncut to be, indeed, a treasure trove for video game reference. I've gathered up pictures of Nariko from various concept art, in game footage, and fan art to give me the information that I need. Even then I still lack the details on her belt strap thingy :(

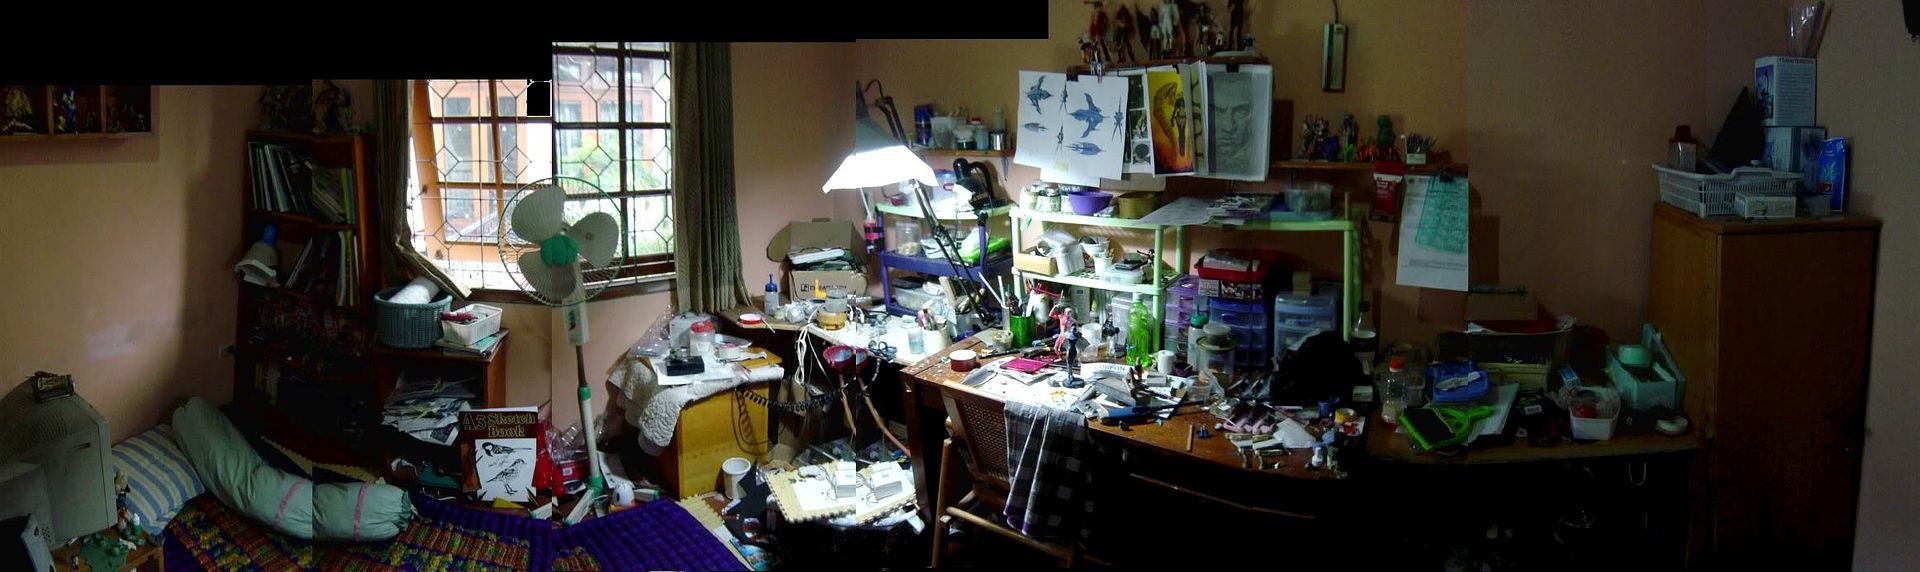
I printed out the pictures and made a wall of reference in my sculpting station. With this step done, I can get to the actual sculpting process.

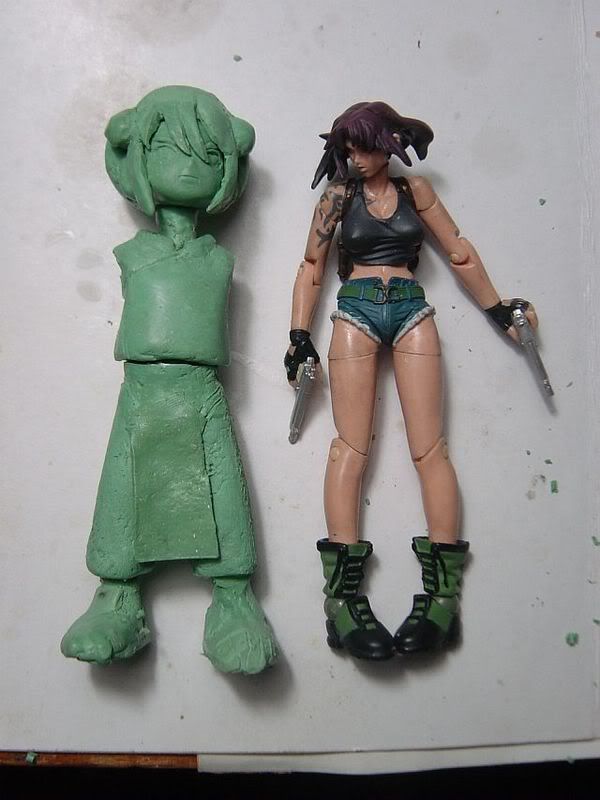
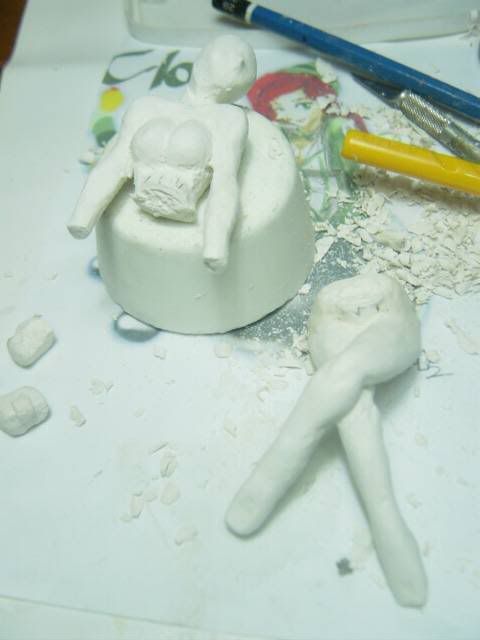
I start with the usual aluminum wire armature as the core of the body and legs. Then it's just a matter of slapping a way the warm wax all over the armature, fleshing out the major muscle groups and tweaking the pose. The picture shows the fruit of about 2 hours of wax pushing labor.

A note about the armature. I construct my armature a little differently. I start by doing the core body and legs, up to the top of the ribcage where the clavicles are. I modeled over it with material, pose it and them made a separate armature for the head and the arms. This method is influenced mostly from Burne Hogarth's Dynamic Figure drawing book. In it he describes that the first thing you that you must implement is the trunk of the body, followed by the legs, arms, and finally the head. I don't necessarily follow this on every project, but it's a good rule of thumb for me.


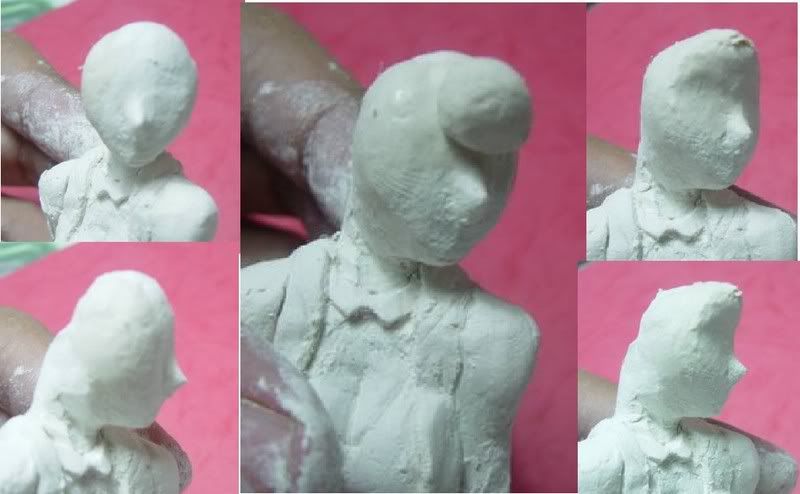
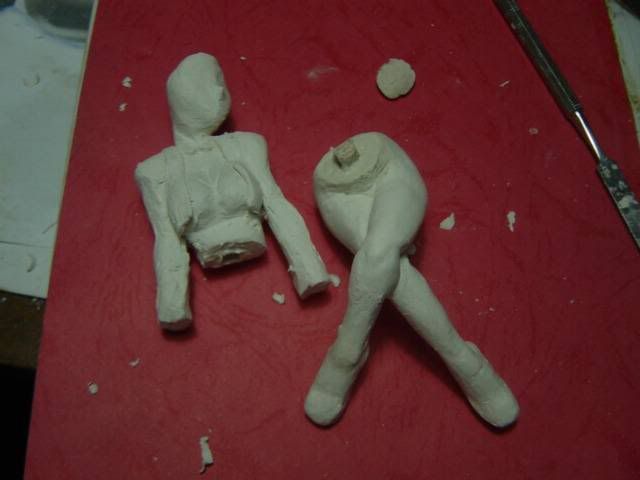
Next we jump way way WAY forward with the sculpt. During this period I accidentally nudge over the sculpt over the table causing it to break. The major damage was on the legs therefore I decide to just cut them off and made this into a 3/4 statue. By this time I've added modeled the majority of the costume and fix her pose. I did the head after fixing up the rest of the body, and wouldn't you know it the head was to frikkin big. It throws off the proportion for the rest of the body. The funny thing is I didn't realize it at first because I've used calipers to measure the proportion and it checks out... at least on the vertical proportion. The problem was the head was too wide. So I scrapped the head and made a new, much smaller head and start there.

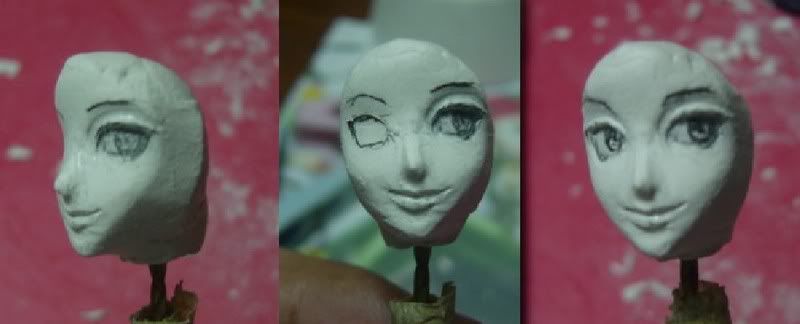
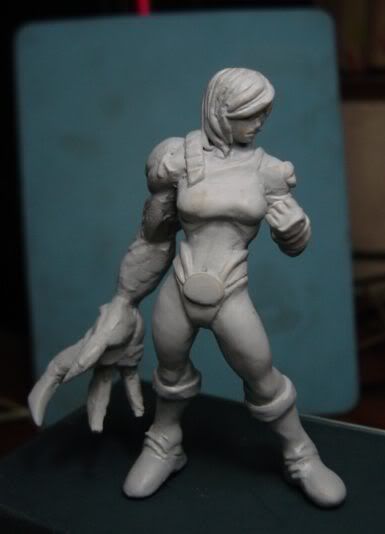
The smaller head size fits wonderfully with the body. JOY! The picture on the right shows the new head sculpt.

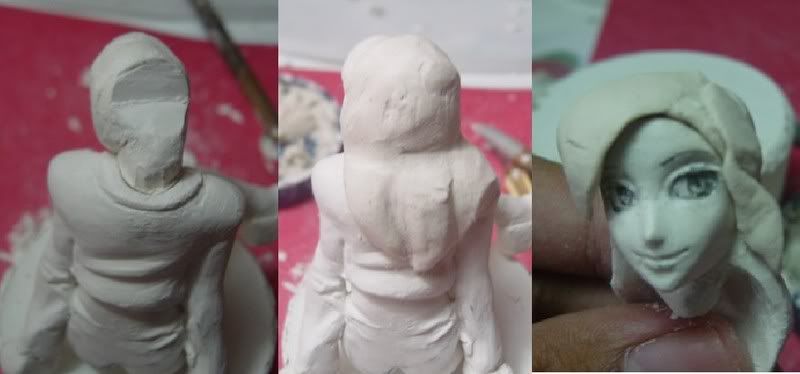
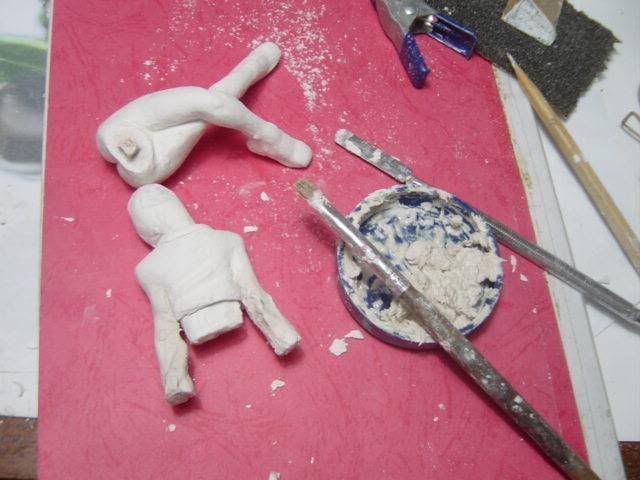
If you're wondering about the different shades of material in this picture, allow me to explain. These are the waxes that I was talking about earlier. I made 3 shades to help me differentiate them. The whitish wax is the softest, I used it as a practice wax to see how something look before I commit myself with harder waxes. The yellow-brown colored wax is my work-horse wax. It firmer and does the bulk of the modeling. The dark colored wax is my hard (yet flexible) wax. It's mainly used for details and parts that is just plain pain-in-the-ass. Billowing capes and flowing hair comes to mind. In the future, I'm going to color them in a neutral grey shades. A slight blue/green tinge perhaps, so it's easier on the eyes.

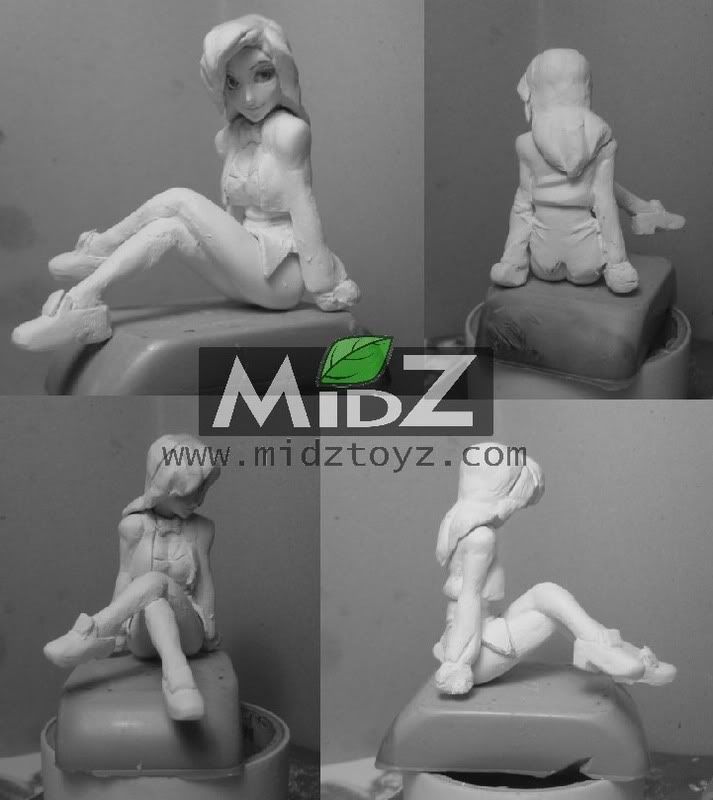
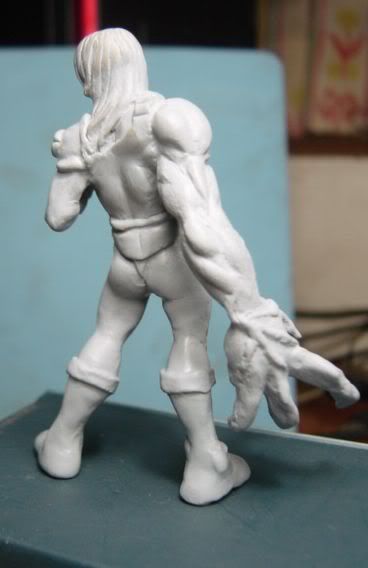
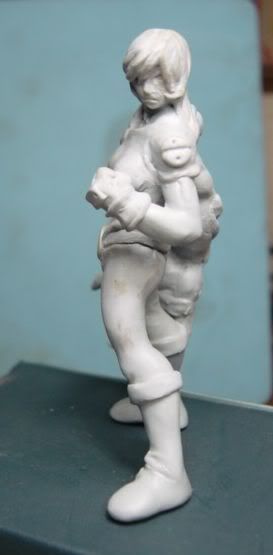
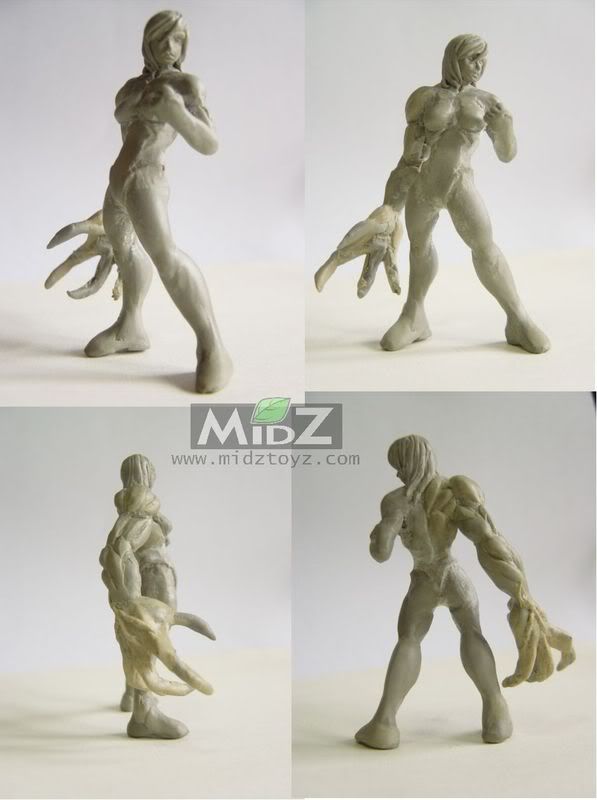
This final image is the current stage of this sculpt. I've added more details on the costume, resculpt the hair using the firm grade wax, and alter her pose a little bit. The next stage will be more tweaking, refining, and smoothing of the surface. I'm also going to make mold off it, since you cant have a 'permanent' wax sculpt, and I wanted to paint her up.

And thats the end of this part of the WIP report. I can assure you that this an ongoing project (Cloe is ongoing too!), so there will be more of it in the near future. I've already have several project lined up to be written and posted, so stay tuned!

As a reminder, I need your help in improving Midztoyz! So do vote at the poll that I've set up (if you cant find it, it's below the shout box, on the right). If you have other suggestion, feel free to give me a shout or drop me a mail!

Good luck on your sculpts everyone!


Thursday, May 1, 2008

Help me improve MidzToyz!

Hi gang!

Sorry for the lack of updates (again) in the past few weeks. I've been caught up with my wax-making experiment, and are now busy preparing samples to be shipped to tester and stocking the shelves.

Anyway, as you might read from the title, I need your help to improve this blog. For this purpose I've added a poll to help me achieve the goal. The poll is about what content you would like to see more in the blog. Do you like to see more tutorials/guides? more WIP shots of the project that I'm working on (the ones where I can show WIP shots that is), or something else. This will help me plan regular updates a little easier. I'm also going to add some reviews about toys and books that has something to do with sculpting and toy making once in a while. There's also a new look for in the works.

The poll will be up until the end of the month. It'll give me a comfortable time space to adjust and make preparation for giving this blog a makeover. So don't forget to vote, people! Your vote is very important to me and the continuation of this blog. If you have other suggestion, just give me shout :lol:

Vote.. Vote.. Vote!

***update***

Got the poll working.
Note to self: Blogger use YY/MM/DD as a valid time format.

Tuesday, April 1, 2008

Making an Anime Figurine: Female Leprechaun part 3. Sculpting the face

We're back again folks!

As promised, in this installment we're going to sculpt a face. An anime face. Again, I didn't take many in-progress shot. But hopefully this few pictures can better explain how I approach sculpting an anime face.

Here we go!

At first I only have a ball shaped like a reverse tear drop to define the head. Then I add the nose and sculpt it into a pointy button shape. Most anime noses are like this. I then add a ball and blend it to make the forehead.

With the forehead added and dried, I then start defining the shape of the face. I draw guide lines where the major facial feature will be placed (eyes, mouth, etc.). I didn't drew in the ears since they're going to be covered by hair anyway. I also drawn in the shape of the chin and jaw to get that 'anime' look. Using a hobby knife, I then carve the contour of the face. I cant really explain, go grab an anime figure and study the face. You'll get what I'm talking about.

Okay, here is the part where I jump way ahead. To sculpt the eyes here is my approach. Draw the outline of the eye. Carve the inside of the eye. Define the eyelids and the area around it (eye socket and supra orbital foramen). Refine the eye as you see fit. I've also done mouth and lips. I made a slit where the mouth is and using a blunt tool I define the lips. The key to success here is good reference and practice, practice, and a whole lot more practice.

The last set of photos are how I made the hair. Not much to say. Just bulk the shape of the hair, dry it, and carve it.


sculpting_anime_face_01 sculpting_anime_face_02
sculpting_anime_face_03 sculpting_anime_face_04

This is the where Cloe is at the moment. Still need more detailing and sanding (oh a lot more of sanding). I still need to sculpt her hat and the pot of gold. But maybe I'll just skip the later and do something else. Next up is the detailing and finishing stages. What that translate is more sanding and priming action! Yay -_-u

Making an anime figure: Cloe


Thats the end of part 3. Make sure to check back soon for part 4.
As always if you have any question about this or any other stuff in this blog, don't be a stranger and drop me a mail :)

Thanks for visiting!

Sunday, March 30, 2008

Making an Anime Figurine: Female Leprechaun part 2

We're back again folks!

My PC got infected by a virus so there's some delay in updating the blog. Sorry for that. I've also keep forgetting to snap a couple of pictures while I'm in the zone. It looks like this figure isn't going to be finished in just 48 hours. I will try to finish it before the month's end though.

Let's get part 2 started!

Picking up from the last post, the armature has dried and it's time to put in some flesh and muscle. At this stage I just put on sausage and ball shapes to define the major muscle groups. This is also the stage to get the (final) pose and balance right. The left most picture was the end result after some drying, carving and sanding. Keep all your shavings and scraps from the carving! I'll tell you why later.

After the pose has been establish, now begin the detailing stage. For this stage it's almost impossible for me not to cut apart a figure. Seeing that in the concept Cloe wear a jacket and pants, it's natural to split the figure into two parts. Torso and legs. From here on I detail the parts separately. I did the torso first by making the bustier and jacket. For the legs, it's a matter of sculpting shoes...that's it. Somewhere in between detailing the torso, I made a peg and a hole to join the two parts together.

The detailing stage took a lot of time, most of it spent on waiting for the parts to dry. Dry the part every time you're happy with your sculpt, and don't do too much at one time. It lower the risk of accidentally ruining your sculpts.

Even after sanding, you're bound to find blemishes on the surface of the figure. This is where the scraps and shavings come into play. I put the shaving in a dish and add in water. The idea is to make a pulpy paste to fill the blemishes. This paste can also be used as glue for broken parts. Just make sure to dry the parts completely afterwards.


Thats the end of part 2. Make sure to check back soon for part 3 where we going to tackle the face and head...Oooh.

Thanks for visiting!

Technorati Tags: , , , , , ,