Monday, April 30, 2007

Making Kagura part 2

Welcome to the second installment of Midztoyz's Figure Making Mini Tutorial.

Sorry for the delay. If you haven't read the first part just click here. There have been some changes to the original plan, but not too much. The figure I'll be making is still Kagura (from Azumanga Daioh), just the scale has changed. I'll be doing a 1:10 scale instead of 1:11. In this installment, I'll be explaining how to work with reference, making armature, and some bits about general sculpting.

So let's continue with the tutorial!

First of all an artist need references, LOTS of it. Fortunetly, the internet is an almost unlimited vault for reference resource. This is where I tell you that,"Google is your fried". Actually any search engine will do. Since we're going to make a figure based on an existing character, we need to collect reference for that character. Get as many reference as you can. There is no such thing as too many reference. While you're at it, get some reference on body proportion, musculature, and poses too. This is also a good time go collect some nude pics and other stuff for..er...anatomical studies. Yeah that's it.

After choosing a reference picture, I print it to the scale I want to make my figure. Kagura is 156 cm, so in 1:10 scale she would be 15,6 cm. I printed out the picture and draw a stick figure by using the print out as a guide. This stick figure will be my template to make the armature. For the armature I use aluminium wire (1mm thick) that I bend to take the shape of my stick figure. The coils seen in the picture is for the foot.


Get the proportion right from the start.
It will save you a lot of trouble in the long run


I then mix up some epoxy putty to make the limbs, chest and groin. The purpose for this is to make the armature have solid 'bones'. This way the only way the armature will bend is at the joints, just like a real skeleton! By doing this you can make realistic poses and don't have to worry about bending the armature in the wrong place. Let the putty cured completely before continuing.


Pay attention to the size of the 'bones' and make sure to leave out the joints.

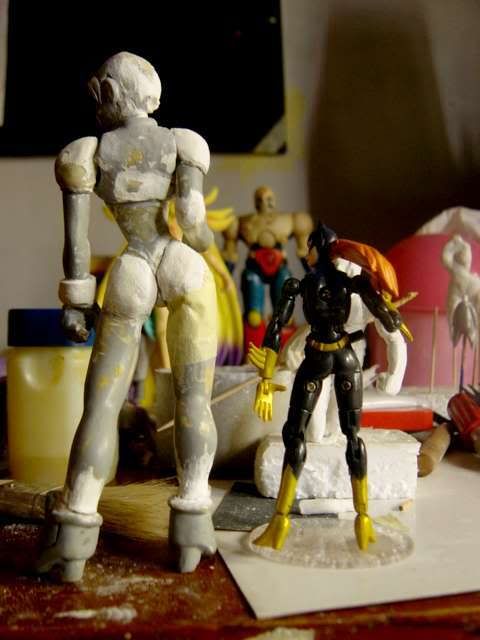
After the putty has cured, we can start posing the armature. I'm going for a sexy streching pose because Kagura is in the swim team. It's a good idea to have someone pose for you to get a natural pose. You can also look at the pose in different angle. Take your time deciding the pose, making sure the pose is just right and didn't look strange or crooked.


Keep the pose natural.

Once you have your pose, it's time build up some muscles. Clay muscles that is. This is the step I start to flesh out the figure. Sorry for the lack of intermediate photos, I do get carried away when I start to use clay. I'm using oil clay for this. It's also good practice to have an anatomy reference handy while you're sculpting. That way you can always double check your muscle placement and avoid making 'imaginary muscles'. Keep building the clay until you have the shape you desired.


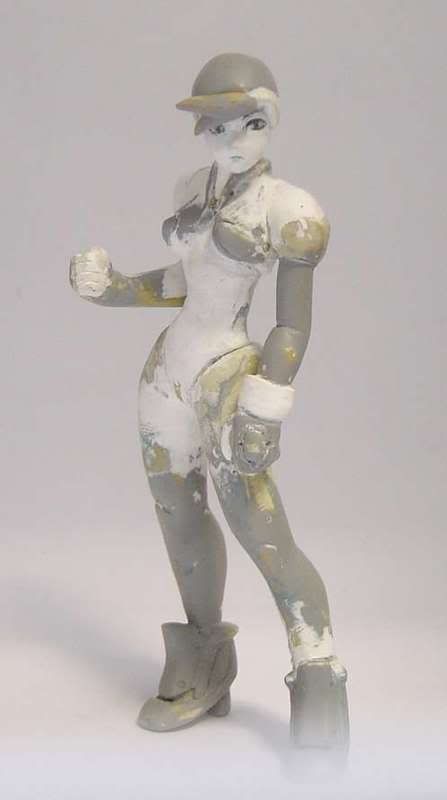
As you can see, for a female figure it lacks something. Make that a pair of things, and we're going to fix that. Yep folks, we're going to make us some boobies. Just make two round balls of clay and taper one side of the ball. Make sure that the balls are similar in size, you dont want lopsided breasts. Attach the breast on the chest and sculpt is as you see fit. If you're wondering how to get a smooth surface for the clay, just use vaseline and a light touch.

Here's she is after a successfull breast augmentation ;)

We got boobies XD

And that's all for this installment.
Next time we'll be sculpting the details. Hands, feet, face and the works.
As usual, just ask if you have any question regarding this post.

Until next time!

Thursday, April 26, 2007

Making Kagura part 1: Materials

Welcome to the first part of Midztoyz's figure making mini-tutorial.

Let's get this tutorial started! The first thing you need to know about making a figure is the material used. This is the stuff that our figure will be made of. There are many to choose, from the common automotive putty to the more expensive professional sculpting clay. It really depends on what you have access to. The materials I used are the ones that I can get my hands on. I live in Jakarta, Indonesia, and this is the stuff that I can get locally, unless noted. I will also try to provide alternatives for these materials if there are any. Let's get down to bussiness.


Oil Clay

Also known as plasticine. This is probably the easiest clay to find. It oil-based so it wont dry out. You want a firm texture with high elasticity. My current favourite is a local brand called 'Raja Ketawa'. It has great elasticity, easy to work with and have a nice scent. I find that the black colored clay is firmer than the other colors. Yellow is the softest. I this clay it to make the basic shapes and rough sculpt for molding. It's also good for practicing sculpting technique. If the clay is getting to soft, just pop it in the fridge for a minute to make it firm. You can then carve and add details.


Polyester Putty

This is polyester putty (poly putty for short). This is my main workhorse putty for making my figures. You might know it as automotive putty, the one used to patch up dents and body repair. It comes with a small bottle of hardener. You mix the putty and hardener with a ratio of 100:2 until you have an even uniform color. The putty itself cannot be worked at until it's cured. It takes about 20 minutes to cure. You can also manipulate the time and hardness of the mix by manipulating the ratio of hardener. More hardener will give you harder and faster curing mix, and vice versa. Keep in mind, if you add to little hardener, the mix will not cure at all and are left with a gooey mess. You can also thin this putty using laquer thinner. It's readily available almost anywhare, and come in tin of 250 g, 1 Kg, and 4 Kg. Be sure to wear proper protection though. The fumes from it is toxic and it stinks!


Epoxy Putty

You mix and equal amount of resin and hardener. Knead it until it's uniform and this putty is ready for use. It'll cure rock hard, you can sand, drillm and tool it. Before it's cured, the texture of this putty is sticky, much like chewed bubble gum. It stick to almost anything. I usually sit a mix for 5-10 minutes before using it. Do keep you hand and tools wet to keep them from sticking to the putty. I mostly used this putty for detail work.


Air-Dry Clay

These are air-dry clay. You use it like oil clay, but it'll cure if you leave it in the air. After curing, the clay can be sand and tooled, but do be careful since this material is brittle. The white one is paper clay. It's a mixture of paper fiber, starch, and clay powder. I love this stuff. It has a high learning curve, and need some getting used to. You can make a mess of yourself if you're not careful, but it's easily cleaned by using water. The brown one use clay powder only, just like those pottery clay. These stuff might be hard to come by. You need to look in speciality and craft shops to find it. I got my paper clay from www.lotuspaperclay.com, the Keramiplast was purchased from a local bookstore.


Polymer Clay

Poly clay for short. This is my newest acquisition. Thanks to Elise from Claygeek for hooking me up with this stuff. Polymer clay is similar to oil clay, the difference is that poly clay will cure when it is baked. I haven't had the chance to work with it much, let alone make a figure out of it. I'll have to get back on this later.


That's the first part of the tutorial. In the next part we will start to make the figure.

So stay tuned!

Making an Anime Figure: Tutorial is underway!

Yep, I've decided to post a complete step-by-step mini tutorial on making an anime figure. In this tutorial I'll be making a 1:11 scale figure of Kagura from Azumanga Daioh. It will be a work in progress, so hopefully I'll update this daily. This tutorial will cover the materials, tools, and steps in making a figure. I haven't plan on making a painting tutorial just yet.

Well stay tuned. I'll have the first part up later tonight.
Until then!

Monday, April 23, 2007

Making Figures: Sinta revisited

Sinta repainted I'm not satisfied with my paintjob on Sinta, and neither was my friend, who commisioned this piece from me. So after some discussion, we agree to repaint Sinta. The most sucky part of the first paint job is the metallic silver color of the dress. The red 'stripe' on the bottom of the skirt just got to go. And her skin is too dark. With all the changes mapped out, I began my weekend hobbyfest.

I started by cleaning and scraping all the paint that I can. I only use water, soap, and a LOT of elbow grease to clean her. After most of the paint is off the figure, I sanded and buff the figure to give myself a smooth surface for paint. After the workout, I'm ready to base coat the figure. I use white spray paint to lay the base coat. It took 3 layers to coat the figure. I even base coat the hair white!

my 'gheto' paint set My more decent paint set
After the basecoat is dry, I started to work on the colors. I use a mixture of poster and acrylic paint to paint all the colors you see here. Yep, no Tamiya color for me, yet. For those of you who are curious, I use Snowman and Sakura brand poster paint, the acrylic I use is Marie's artist acrylic.I first tackle the skintones. I mix pale orange with white (4:1) and a bit of lemon yellow. To thin the paint I use water, just water. I've learned from my previous attempt that adding alcohol to the mix will make the pigments clump and made the paint chalky. To stop the paint from drying to quickly and help eliminate brushstrokes, I add a few drop of dishwahing liquid. I then apply the paint in thin coats on the figure, making sure the previous coat is completely dry before a lay another coat. It takes 3 layers to achieve an even coating. I use the term 'even' very loosely, since you can see many brush strokes here and there. The bottom line is, if you have good model paints, dont use poster paints. I then drybrush the highlight and the shadows of the skin. For the highlight, I add more white and a bit yellow to the base skintone. I added burnt umber for the shadows.

After I finished coloring all the piece, I spary a top coat of dull laquer to seal the paint job. I like the end result. She now have more presence than before. The contrast between the black hair and white dress is sharp. The red and yellow really accented the figure well. I'm liking this color scheme. It maybe not the best paint job out there, but heck I paint a figure with poster paints!

And that's it for now. I hope you enjoy it.
If you have any question you could just ask through the comments or shoutbox. You can ask in both English or Indonesian. I'll try to answer your queries as best as I can.


Until next time!

Here's more photos of Neo Sinta


Sunday, April 22, 2007

Figure Making Tutorial poll

Hello everybody!

I've promised to post some of my tutorials and guides for making figures. Now I want you to help me decide which one should I put up first. The choices are as below: You could participate by entering your vote in the shoutbox. Dont forget to fill in your name :)

The subjects are:
1. Sculpting an anime figure from clay
2. Alternative tools parade
3. Painting your kit with poster paint!

Choose only one please. The subjects with the most number of votes will be posted first.

Until then, happy voting!

Wednesday, April 18, 2007

Making a figure: Arjuna v.2 pt. 3

Just a small update on this figure. Fix the hip, although a lot more fixing is still needed. If you're wondering about the breast area, it the light. She has almost equal size boobies. The figure on the right is my reference, a microman Batgirl. Here's one more shot of the figure from the back. I've sculpted some gluteus muscles. Now she got something to sit on ;)


Well, that's it for now. Really short post isn't it. I'll promise I'll get right at work on those long tutorial article posts soon.


Until next time!

Monday, April 16, 2007

Figure making: more Arjuna ver 2.0

I've done a lot of work on her during the weekend. Finally fixed the right arm, sculpted the torso and all-around area. I've even sculpt her a new face! This time it's more anime-ish than before. I've also added some 'baggage' on the rear. Now she got some junk in the trunk ;)

If you're wondering what the white stuff are, they're paper clay. I love working with this stuff. It sands smooth, take detail well, and if you mess up, just put some water and rework it. AWESOME!

I take the picture using my photobox. Sorry for the blur near the bottom. It's actually my reflector. I'll do a better job next shoot. Well, that just left detailing and priming. I was hoping to finish this figure by the end of the month. Painting it would be a treat.

Until next time! Enjoy the pics


Photo Sharing and Video Hosting at Photobucket Photo Sharing and Video Hosting at Photobucket Photo Sharing and Video Hosting at Photobucket Photo Sharing and Video Hosting at Photobucket

Friday, April 13, 2007

Cheap mini photo studio

This might not be about figures, but taking a good photo can make a mediocre (or even bad) figure look decent! Photo equipment doesn't come cheap. Since I'm not the kind of person who easily forks money for equipmet that I can (at least try) to make myself, I search the net and found a very helpfull article. And yep you guessed it, I made myself a cheap mini photo studio.


How cheap is it? Well, I already got the box, tape, white card paper, tracing papers (it's commonly known as 'kertas kalkir' here) and lamp, so I spend nothing on it. You can't beat that! I dont have many shots on the box, yet though. My previous post regarding Arjuna is shot using the box. Here is a shot of the box that I made, and a test shot using tungsten lamp. All photos are shot using a Sony Cybershot DSC-P7 camera with the macro setting on.


Wednesday, April 11, 2007

Making a Figure: Arjuna Ver 2.0 Update!

It's that time again.
In my never-ending journey to make my own anime figures, I meet many challenges. Posing the figure is one of them
I've finally managed to finalize the pose for Arjuna. I wont be changing the pose anytime soon. Now I just need to prep this baby up for paint. Who knows, if there's interest, I might actually cast this and make it a garage kit (hint, hint..)

I will be updating a lot more frequently now. With 5, yep count it FIVE figures in the works at the same time, this blog will fill up fast. Well technically, I'm only allowed to post 3 of them, still that's a lot. And did I mention all the figures must be done at the end of June?

For all of you who asked (or wanted to ask), Yes I do take commisions. Just contact me if you have something in mind. I know we could strike an amicable agreement :)

Untill next time!

Saturday, April 7, 2007

Arjuna Ver 2.0

Well, I've finally did it. I've remodeled my Arjuna. The first version is ok, but I feel it lacks the personality and character that I had in mind. The pose seem stiff too, although when she was first finished it look good! Darn good!

Anyway I decide to make a standing pose. The picture is the current (and hopefully the final) pose of Arjuna. I will also try and resculpt the face and her body. Just to make her more sexy.